🔰 Starter tutorial
Installing the viewer
The viewer is the most accessible tool for working with the framework. The simplest way to grab it is to download the last pre-build of it on the Releases page.
An alternative to this is to build the development environment without
installing anything on the system, more specifically: the first method of the
installation guide. In a nutshell: ./configure.py && make creates a
complete Python-based working environment. Within that virtual environment, the
ngl-viewer command is available.
Creating a simple scene in Python
Edit a new script such as mydemo.py and add the following code:
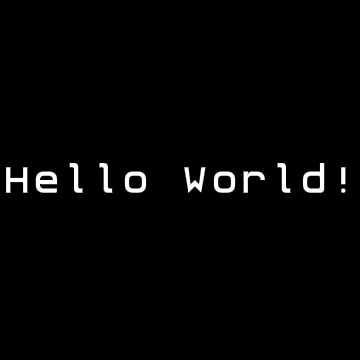
import pynopegl as ngl
@ngl.scene()
def hello_world(cfg: ngl.SceneCfg):
cfg.aspect_ratio = (1, 1)
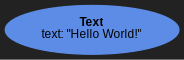
return ngl.Text("Hello World!")
Loading that script in the viewer should provide the same rendering observed here.
In this first example, all we did was to declare a function that returns a
single node (the Text node). The @ngl.scene() decorator is used to make
it discoverable by the viewer. The function receives a configuration of type
SceneCfg which gives us access to various metadata of the scene such as
aspect_ratio, duration or framerate (for both reading and sometimes
writing).
Try to modify the text in the script: the viewer should automatically update the preview.
Making a simple composition
To add a background to our scene, we need to create a composition where we first draw that background, then our text. For the background, we can pick one of the proposition from the renders howtos. For the composition itself, we can rely on the Group node to split the graph in two branches:
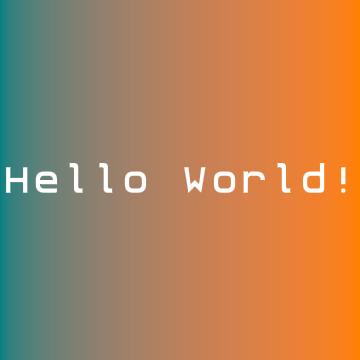
import pynopegl as ngl


@ngl.scene()
def bg_fg_composition(cfg: ngl.SceneCfg):
    cfg.aspect_ratio = (1, 1)

    bg = ngl.RenderGradient(color0=(0, 0.5, 0.5), color1=(1, 0.5, 0))
    fg = ngl.Text("Hello World!", bg_opacity=0)
    return ngl.Group(children=[bg, fg])
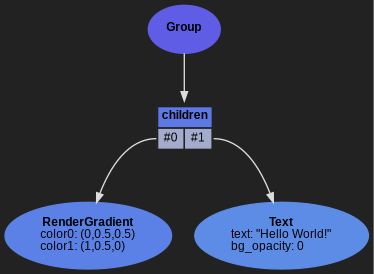
Looking at the graph tab should clarify the structure constructed here.
You may have noticed that we did change the Text.bg_opacity parameter. Try to
play with that value (somewhere between 0 and 1) to see how it impacts the scene.
Animating values
In many cases, node parameters that accept constant values also accept nodes.
We can see that it’s the case with RenderGradient parameters (look for the
node flag), and notably color1 and color2 we’re currently using in our
scene. Accepting nodes means we could animate these parameters:
import pynopegl as ngl


@ngl.scene()
def animated(cfg: ngl.SceneCfg):
    cfg.aspect_ratio = (1, 1)
    cfg.duration = 3

    d = cfg.duration

    color0_animkf = [
        ngl.AnimKeyFrameColor(time=0, color=(0.0, 0.5, 0.5)),
        ngl.AnimKeyFrameColor(time=d / 2, color=(1.0, 0.0, 1.0)),
        ngl.AnimKeyFrameColor(time=d, color=(0.0, 0.5, 0.5)),
    ]

    color1_animkf = [
        ngl.AnimKeyFrameColor(time=0, color=(1.0, 0.5, 0.5)),
        ngl.AnimKeyFrameColor(time=d / 2, color=(1.0, 1.0, 0.5)),
        ngl.AnimKeyFrameColor(time=d, color=(1.0, 0.5, 0.5)),
    ]

    color0 = ngl.AnimatedColor(keyframes=color0_animkf)
    color1 = ngl.AnimatedColor(keyframes=color1_animkf)

    bg = ngl.RenderGradient(color0=color0, color1=color1)
    fg = ngl.Text("Hello World!", bg_opacity=0)
    return ngl.Group(children=[bg, fg])

color0_animkf and color1_animkf define time key frames. Each of these time
key frames associate a time with a value, for which the engine interpolates the
intermediate values for a given time. The interpolations are linear by default,
but you can customize that. More specifically, try to change the easing
parameter of the AnimkeyFrameColor nodes (but the first one) to adjust the
rhythm of the scene.
You may also have noticed in the RenderGradient documentation that the positions of the gradients could be changed. You could try to do that with the help of an AnimatedVec2 and AnimKeyFrameVec2.
Transforming geometries
The object geometries can be modified using various transformation nodes. You
can find a few examples in the transforms howtos. They can be nested just like
functions, so if we want to scale down then rotate, we would express it with
Rotate(Scale(target)). Let’s do that to our text node:
import pynopegl as ngl


@ngl.scene()
def transforms(cfg: ngl.SceneCfg):
    cfg.aspect_ratio = (1, 1)
    cfg.duration = 3

    d = cfg.duration

    color0_animkf = [
        ngl.AnimKeyFrameColor(time=0, color=(0.0, 0.5, 0.5)),
        ngl.AnimKeyFrameColor(time=d / 2, color=(1.0, 0.0, 1.0)),
        ngl.AnimKeyFrameColor(time=d, color=(0.0, 0.5, 0.5)),
    ]

    color1_animkf = [
        ngl.AnimKeyFrameColor(time=0, color=(1.0, 0.5, 0.5)),
        ngl.AnimKeyFrameColor(time=d / 2, color=(1.0, 1.0, 0.5)),
        ngl.AnimKeyFrameColor(time=d, color=(1.0, 0.5, 0.5)),
    ]

    color0 = ngl.AnimatedColor(keyframes=color0_animkf)
    color1 = ngl.AnimatedColor(keyframes=color1_animkf)

    bg = ngl.RenderGradient(color0=color0, color1=color1)
    fg = ngl.Text("Hello World!", bg_opacity=0)

    rotate_animkf = [
        ngl.AnimKeyFrameFloat(time=0, value=15),
        ngl.AnimKeyFrameFloat(time=d / 2, value=-15, easing="exp_in"),
        ngl.AnimKeyFrameFloat(time=d, value=15, easing="exp_out"),
    ]

    scaled_fg = ngl.Scale(fg, factors=(0.7, 0.7, 0.7))
    rotated_fg = ngl.Rotate(scaled_fg, angle=ngl.AnimatedFloat(rotate_animkf))

    return ngl.Group(children=[bg, rotated_fg])
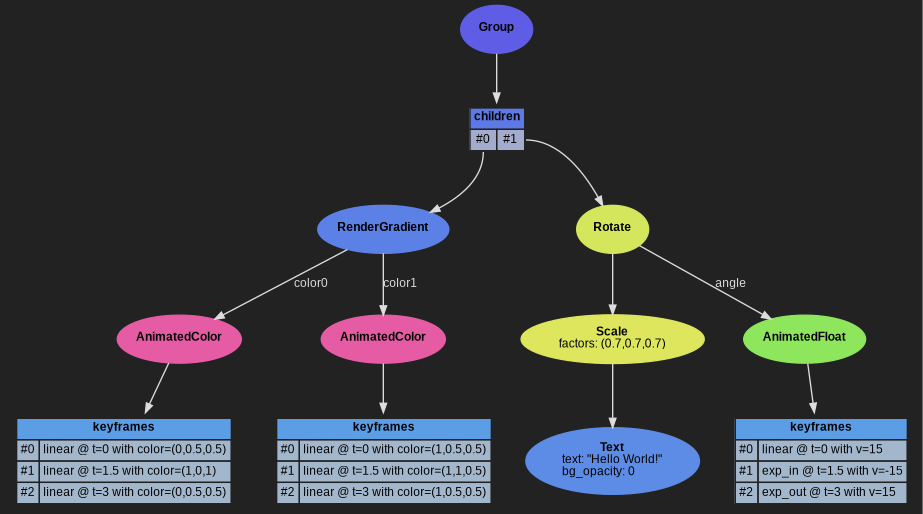
Again, looking at the graph tab may clarify the structure constructed here.
Exposing parameters
Some node parameters have the live flag. This means we can expose a
live-control up to the GUI. Try for example to add live_id="my_text" to the
Text node and see how it appears in the viewer.
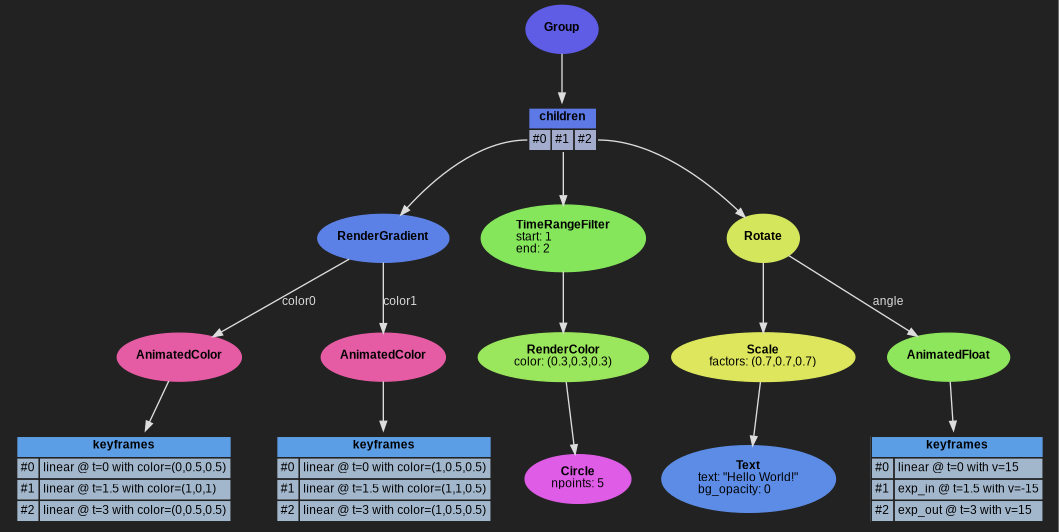
Controlling the visibility of objects
For this last subsection, we are going to see how to control when things are visible or not. We will be using a TimeRangeFilter to make a shape shortly appears behind the text.
import pynopegl as ngl


@ngl.scene()
def timeranges(cfg: ngl.SceneCfg):
    cfg.aspect_ratio = (1, 1)
    cfg.duration = 3

    d = cfg.duration

    color0_animkf = [
        ngl.AnimKeyFrameColor(time=0, color=(0.0, 0.5, 0.5)),
        ngl.AnimKeyFrameColor(time=d / 2, color=(1.0, 0.0, 1.0)),
        ngl.AnimKeyFrameColor(time=d, color=(0.0, 0.5, 0.5)),
    ]

    color1_animkf = [
        ngl.AnimKeyFrameColor(time=0, color=(1.0, 0.5, 0.5)),
        ngl.AnimKeyFrameColor(time=d / 2, color=(1.0, 1.0, 0.5)),
        ngl.AnimKeyFrameColor(time=d, color=(1.0, 0.5, 0.5)),
    ]

    color0 = ngl.AnimatedColor(keyframes=color0_animkf)
    color1 = ngl.AnimatedColor(keyframes=color1_animkf)

    bg = ngl.RenderGradient(color0=color0, color1=color1)
    fg = ngl.Text("Hello World!", bg_opacity=0)

    rotate_animkf = [
        ngl.AnimKeyFrameFloat(time=0, value=15),
        ngl.AnimKeyFrameFloat(time=d / 2, value=-15, easing="exp_in"),
        ngl.AnimKeyFrameFloat(time=d, value=15, easing="exp_out"),
    ]

    scaled_fg = ngl.Scale(fg, factors=(0.7, 0.7, 0.7))
    rotated_fg = ngl.Rotate(scaled_fg, angle=ngl.AnimatedFloat(rotate_animkf))

    shape = ngl.RenderColor(color=(0.3, 0.3, 0.3), geometry=ngl.Circle(npoints=5))
    timed_shape = ngl.TimeRangeFilter(shape, start=1, end=2)

    return ngl.Group(children=[bg, timed_shape, rotated_fg])
Diving into the documentation
From here, if you you’re looking at a specific area, you may want to look at the how-to guides.
If you need to understand the why of certain design decisions or limitations, the discussions and explanations section will come to an help.
Finally, in every situation, you will feel the need to check out the reference documentation for austere but exhaustive information, and in particular, all the node definitions.